Valentine’s Day just isn’t complete without something sweet to share, and let me tell you, these creamy raspberry pudding cups are my go-to every year. They’re the kind of dessert that looks fancy but secretly comes together with barely any effort, perfect for when you want to impress without the stress. The silky vanilla pudding layered with tart, juicy raspberries is pure magic in a cup. Whether you’re surprising your sweetheart or treating yourself (because why not?), this dessert is all about love in every bite. Trust me, once you try it, you’ll never go back to store-bought Valentine’s treats again!

Why You’ll Love These Creamy Raspberry Pudding Cups
These little cups of joy have stolen my heart (and probably will steal yours too) for so many reasons. Seriously, I make them year-round, but they’re extra special for Valentine’s Day.
Quick and Easy to Make
I’ll let you in on a secret, this looks way fancier than it actually is to make. You’re basically whisking, stirring, and layering. No fancy techniques, I promise! The hardest part is waiting for them to chill (and resisting the urge to eat the pudding straight from the pot, been there).
Rich and Creamy Texture
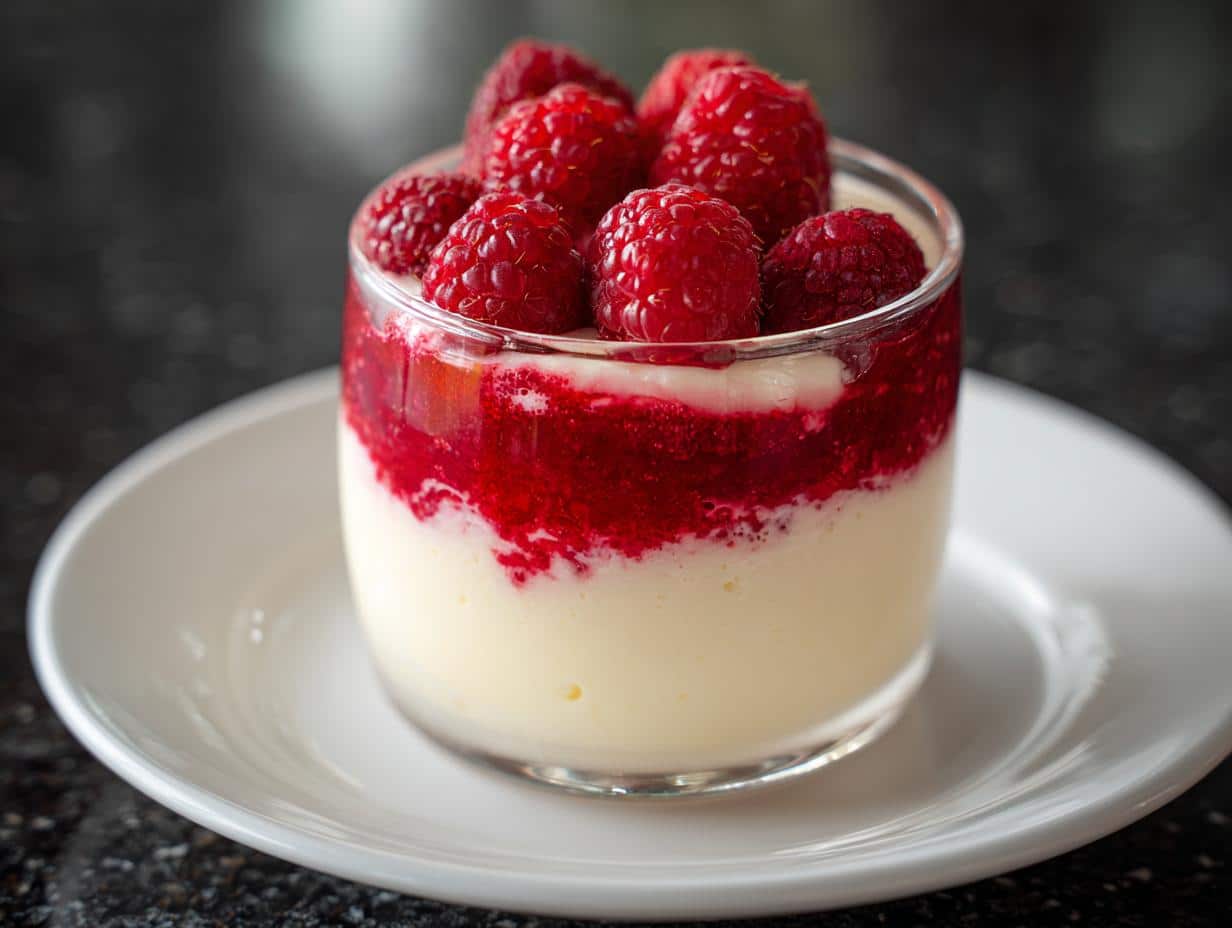
That first spoonful of silky vanilla pudding against the bright raspberry layer? Absolute heaven. The cream gives it this luxurious mouthfeel that’ll make you feel like you’re eating at some fancy dessert bar. And that pop of fresh berry flavor cuts through the richness perfectly.
Perfect for Valentine’s Day
Pink and creamy with little heart-shaped garnishes if you’re feeling extra? Yes please! They’re personal-sized, romantic, and just sweet enough without being over the top. I’ve served these at Galentine’s brunches, date nights in, and even as a “just because” treat for my kids. The red raspberries make them look so festive without any food coloring.
Creamy Raspberry Pudding Cups
Ingredients
Method
- In a saucepan, whisk together heavy cream, milk, sugar, and cornstarch over medium heat.
- Cook until the mixture thickens, stirring constantly, about 5-7 minutes.
- Remove from heat and stir in vanilla extract. Let cool slightly.
- In a separate bowl, mash raspberries with sugar and lemon juice.
- Layer the pudding and raspberry mixture in cups. Chill for at least 2 hours before serving.
Notes

Ingredients for Creamy Raspberry Pudding Cups
Okay, let’s talk ingredients, and trust me, you’ll want to use the good stuff here! Everything comes together so simply, but quality makes all the difference. I’ve broken it down into two parts because that’s how my brain works when I’m gathering everything on the counter.
For the Pudding
This is where the magic starts:
- 2 cups heavy cream, Don’t skimp! This gives that dreamy, velvety texture
- 1 cup whole milk, The extra fat content helps balance the cream
- 1/2 cup sugar, Just enough sweetness without overpowering the raspberries
- 1/4 cup cornstarch, Our thickening hero (no lumps if you whisk it in cold!)
- 1 tsp vanilla extract, Pure, please! The fake stuff just won’t do
For the Raspberry Layer
The tart, fruity counterpoint:
- 1 cup fresh raspberries, Look for plump, bright red ones (frozen work in a pinch)
- 2 tbsp sugar, Takes the edge off the berries’ natural tartness
- 1 tbsp lemon juice, Just a squeeze brightens everything up
How to Make Creamy Raspberry Pudding Cups
Alright, let’s get to the fun part, making these dreamy little desserts! I’ve broken it down into simple steps so you can nail it on your first try. Just follow along and you’ll be spooning into pudding heaven before you know it.
Step 1: Prepare the Pudding Base
Grab your favorite saucepan (mine’s the red one with the slightly burnt handle, don’t judge!) and whisk together the heavy cream, milk, sugar, and cornstarch. Make sure to whisk until everything’s completely smooth, no cornstarch lumps allowed! Medium heat is your friend here, too hot and you’ll scorch the bottom.
Step 2: Cook Until Thickened
Now comes the arm workout! Stir constantly for 5-7 minutes until the mixture turns thick and coats the back of your spoon. You’ll know it’s ready when you can run your finger through the pudding on the spoon and the line holds. Resist the urge to walk away, this stuff thickens fast!
Step 3: Add Vanilla and Cool
Take the pan off the heat and stir in that glorious vanilla extract. Let it cool for about 10 minutes, this prevents the raspberry layer from melting when you assemble. Pro tip: press plastic wrap directly on the surface to prevent a skin from forming.
Step 4: Make the Raspberry Layer
While the pudding cools, mash those beautiful raspberries with sugar and lemon juice in a bowl. I like mine a bit chunky for texture, but you can strain it if you prefer silky smooth. The lemon juice makes the raspberry flavor pop!
Step 5: Layer and Chill
Now the fun part! Spoon alternating layers of pudding and raspberry mixture into your cups. I usually do two layers of each. Pop them in the fridge for at least 2 hours, the wait is torture, but so worth it! They’ll keep beautifully for up to 3 days if you can resist eating them all at once.

Tips for Perfect Creamy Raspberry Pudding Cups
Want to take your pudding cups from good to “oh wow!”? Here are my tried-and-true tricks. For silky raspberry layers, press the mashed berries through a fine mesh sieve, it catches all those pesky seeds. Chill them in individual glasses for a fancy look, or use mason jars for easy gifting. And whatever you do, don’t skip the full 2-hour chill time, that’s when the magic happens and the flavors really come together!
Variations for Creamy Raspberry Pudding Cups
Oh, the possibilities! These pudding cups are like a blank canvas for your dessert dreams. Swap raspberries for lush blackberries or tangy strawberries when they’re in season, each berry brings its own personality. Feeling decadent? Drizzle melted chocolate between the layers or sprinkle crushed pistachios on top for crunch. My neighbor swears by mixing in a splash of Chambord with the raspberries for adult-only versions. Honestly, once you’ve got the basic pudding down, you can get as creative as your heart (or sweet tooth) desires! If you are looking for other decadent desserts, check out some dessert recipes.
Serving Suggestions for Creamy Raspberry Pudding Cups
Oh, how I love serving these beauties! A dollop of fresh whipped cream on top never hurts (okay, I always do it). For Valentine’s Day, I’ll add heart-shaped raspberry slices or a mint leaf for that extra love. They’re perfect just as is too, no fuss needed! For other romantic ideas, you might enjoy these chocolate raspberry ganache hearts.
Storage and Reheating
These pudding cups keep like a dream in the fridge! Just cover them tightly with plastic wrap (press it right against the surface) and they’ll stay fresh for up to 3 days. No reheating needed, they’re meant to be enjoyed chilled. Though let’s be honest, leftovers rarely last that long in my house!
Nutritional Information
Each creamy raspberry pudding cup comes in at about 320 calories, not bad for such a decadent-tasting treat! You’re looking at 35g carbs (mostly from the natural fruit sugars), 20g of that dreamy cream fat, and a nice little protein boost too. The raspberries pack in vitamin C and fiber. Of course, these numbers might wiggle a bit depending on your exact ingredients, especially if you go wild with the whipped cream topping like I usually do! For more nutritional insights on recipes, visit recipesloop.com.
Frequently Asked Questions
I get SO many questions about these pudding cups every time I serve them, here are the ones that pop up most often!
Can I Use Frozen Raspberries?
Absolutely! Just thaw them first and drain any excess liquid. Frozen berries actually work great year-round when fresh ones aren’t at their best. The texture might be slightly softer, but the flavor is still fantastic. I keep a bag in my freezer just for pudding emergencies!
How Long Do These Pudding Cups Last?
In my fridge? Maybe 24 hours if I’m feeling generous! But seriously, they keep beautifully for up to 3 days when properly stored with plastic wrap pressed right on the surface. The raspberry layer might bleed a little into the pudding over time, but it still tastes amazing.
Can I Make This Dairy-Free?
You sure can! Swap the heavy cream for full-fat coconut milk and use almond or oat milk instead of regular. The texture will be slightly different but still creamy and delicious. Just make sure your cornstarch is blended really well with the cold milk alternative before heating. If you are interested in other dairy-free options, check out these coconut cream candy hearts.
I’d love to see your beautiful creations! Did you add any special twists? Drop a comment below or tag me on social, nothing makes me happier than seeing these pudding cups spreading joy in other kitchens! If you’re looking for more inspiration, check out the recent posts on the site.


